
Want to manage your own multiplayer Minecraft server? With containers and cloud technology, it’s never been easier. Follow the steps below to get up and running in minutes.
Minecraft
Minecraft is a groundbreaking single and multiplayer sandbox video game. It has been ported to various game platforms and is the best selling video game of all time. It’s super-fun, educational, and has a cult-like following. I love it.
There are currently two flavors of Minecraft: Java and Bedrock. The Java edition will only run on desktop computers, and the Bedrock edition will run on Windows 10, Xbox, and mobile devices. Choose wisely, as the two flavors are not compatible with each other. We’re going to be covering the Bedrock edition, but these steps can be applied to Java as well.
Minecraft servers run a persistent multiplayer game world. Hosting your own server provides you with full control over your world, and a place where you and your friends can play anytime.
In order to play Minecraft on your server, you will need to have a local copy of Minecraft on your device, so download that where you want to play Minecraft.

Docker
Docker allows developers to isolate their app inside containers, a standardized unit of software that simplifies and accelerates the development workflow. To get started, you’ll want to download Docker Desktop for your computer.
Fortunately, there are some solid Docker images available for us to start with. We’re going to use itzg/minecraft-bedrock-server. Let’s make a Docker Compose file and test this locally.
Note: if you want to build the Java edition server, use itzg/minecraft-server.
Create a docker-compose.yml file:
version: '3.4'

services:
  bds:
    image: itzg/minecraft-bedrock-server
    environment:
      EULA: 'TRUE'
      GAMEMODE: survival
      DIFFICULTY: normal
    ports:
      - 19132:19132/udp
    volumes:
      - bds:/data
    container_name: bds

volumes:
  bds: {}
In the same directory, start up the container with the command:docker-compose up -d
You can watch the logs with this command:docker logs -f bds
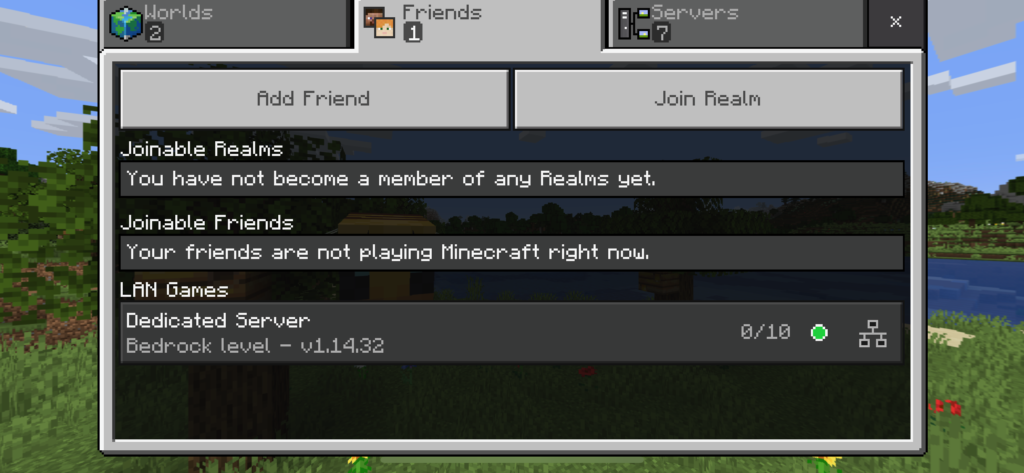
Now you can launch Minecraft on your device. Press Play. Go to the Friends tab. You should see your Minecraft server listed under LAN Games. Join the game and you’ll be wandering around the world that resides on your local container.
When you’re done running around punching trees, you can close the logs ^C and stop the container: docker-compose down

Azure
Azure is Microsoft’s cloud computing services solution. We’re going to use Azure to deploy our Minecraft container to the cloud.
First, if you don’t already have one, sign up for an Azure free trial with a Microsoft account. We’re going to be using the Azure CLI. You can install this on Mac OS with homebrew: brew update && brew install azure-cli
Login
Login to the CLI with your Azure credentials: az login
Create a resource group
Everything we do for this project will fall under an Azure resource group. Let’s create one:
az group create --name <myResourceGroup> --location eastusReplace <myResourceGroup> with the name of your resource group. This assumes you want to deploy to the eastus region, but change that if you wish.
Create a registry and push the image
To deploy a container to Azure, we’re going to need to create a container registry (replace <myRegistryName> with the name you want for your container registry).
az acr create --resource-group <myResourceGroup> --name <myRegistryName> --sku BasicNow we can tag the Minecraft server image and prep it for pushing to a repository (replace <myRepository> with the name of your repository:
docker tag itzg/minecraft-bedrock-server <myResourceGroup>/<myRepository>:v1Finally, push the image to your repository:
docker push <myResourceGroup>/<myRepository>:v1Create a storage account
In order to persist our Minecraft world and any mods we may want to add to our server, we will need an Azure file share. This will belong to a storage account. First, create the account:
az storage account create \
    --resource-group <myResourceGroup> \
    --name <myStorageAccount> \
    --kind StorageV2 \
    --sku Standard_ZRS \
    --enable-large-file-share \
    --output none
Create a file share
To create the file share, we need a key from the storage account. Let’s get the key:
storageAccountKey=$(az storage account keys list \
    --resource-group <myResourceGroup> \
    --account-name <myStorageAccount> \
    --query "[0].value" | tr -d '"')
Now we can create the file share with our key (replace <myShareName> with the name of your file share):
az storage share create \
    --account-name <myStorageAccount> \
    --account-key $storageAccountKey \
    --name <myShareName> \
    --quota 1024 \
    --output none
Create our container
So with our image repository and our file share, we can now deploy our container to Azure (replace <myDnsName> with the name you would like in your container URL:
az container create \
    --resource-group <myResourceGroup> \
    --name <myContainerName> \
    --image <myResourceGroup>/<myRepository>:latest \
    --dns-name-label <myDnsName> \
    --ports 19132 \
    --protocol UDP \
    --azure-file-volume-account-name <myStorageAccoount> \
    --azure-file-volume-account-key $storageAccountKey \
    --azure-file-volume-share-name <myShareName> \
    --azure-file-volume-mount-path /data \
    --environment-variables \
        'EULA'='TRUE' \
        'GAMEMODE'='survival' \
        'DIFFICULTY'='normal'
After a moment, the deployment will complete. You can check the status with this command:
az container show \
    --resource-group <myResourceGroup> \
    --name <myContainerName> \
    --query "{FQDN:ipAddress.fqdn,ProvisioningState:provisioningState}" \
    --out table
This will output your container’s fully qualified domain name (FQDN). The FQDN is what you can use to connect to your new cloud Minecraft server.
Launch Minecraft on your device, press Play, and go to the Servers tab. Select “Add Server”, enter anything you like for the Server Name, and enter the FQDN in the Server Address field. Press Save, scroll down to the More Servers section, and you will see your new Minecraft server in the list.
Invite your friends, and enjoy your new custom Minecraft world!
If you enjoyed this tutorial, have any questions, or have any Minecraft server tips you’d like to share, please drop me a line.
Keep making! 🚀